AR Hand tracking is not a new playground for researchers developing image and video processing applications. After some time, hand tracking became important for many immersive applications such as Augmented Reality (AR). Even though devices with embedded sensors detect hand gestures, such as hand tracking Oculus Quest 2, hand tracking VR devices and hand tracking gloves for mixed reality applications, it is pretty complex and processor-intensive work to track hands with hand-held mobile AR applications.
Hand tracking may not very practical on hand-held mobile AR, but this technique is important for making AR interactions for HMDs and other hands-free devices.
I was searching for a way to implement hand tracking in augmented reality and found this great YouTube tutorial. That is the only guide I could find apart from the Lightship documentation, but the video was in Spanish. I thought to write this article to give you a step by step guide on how I managed to setup my project following the above video. Most of my code is inspired by his work, so kudos to the original developer.
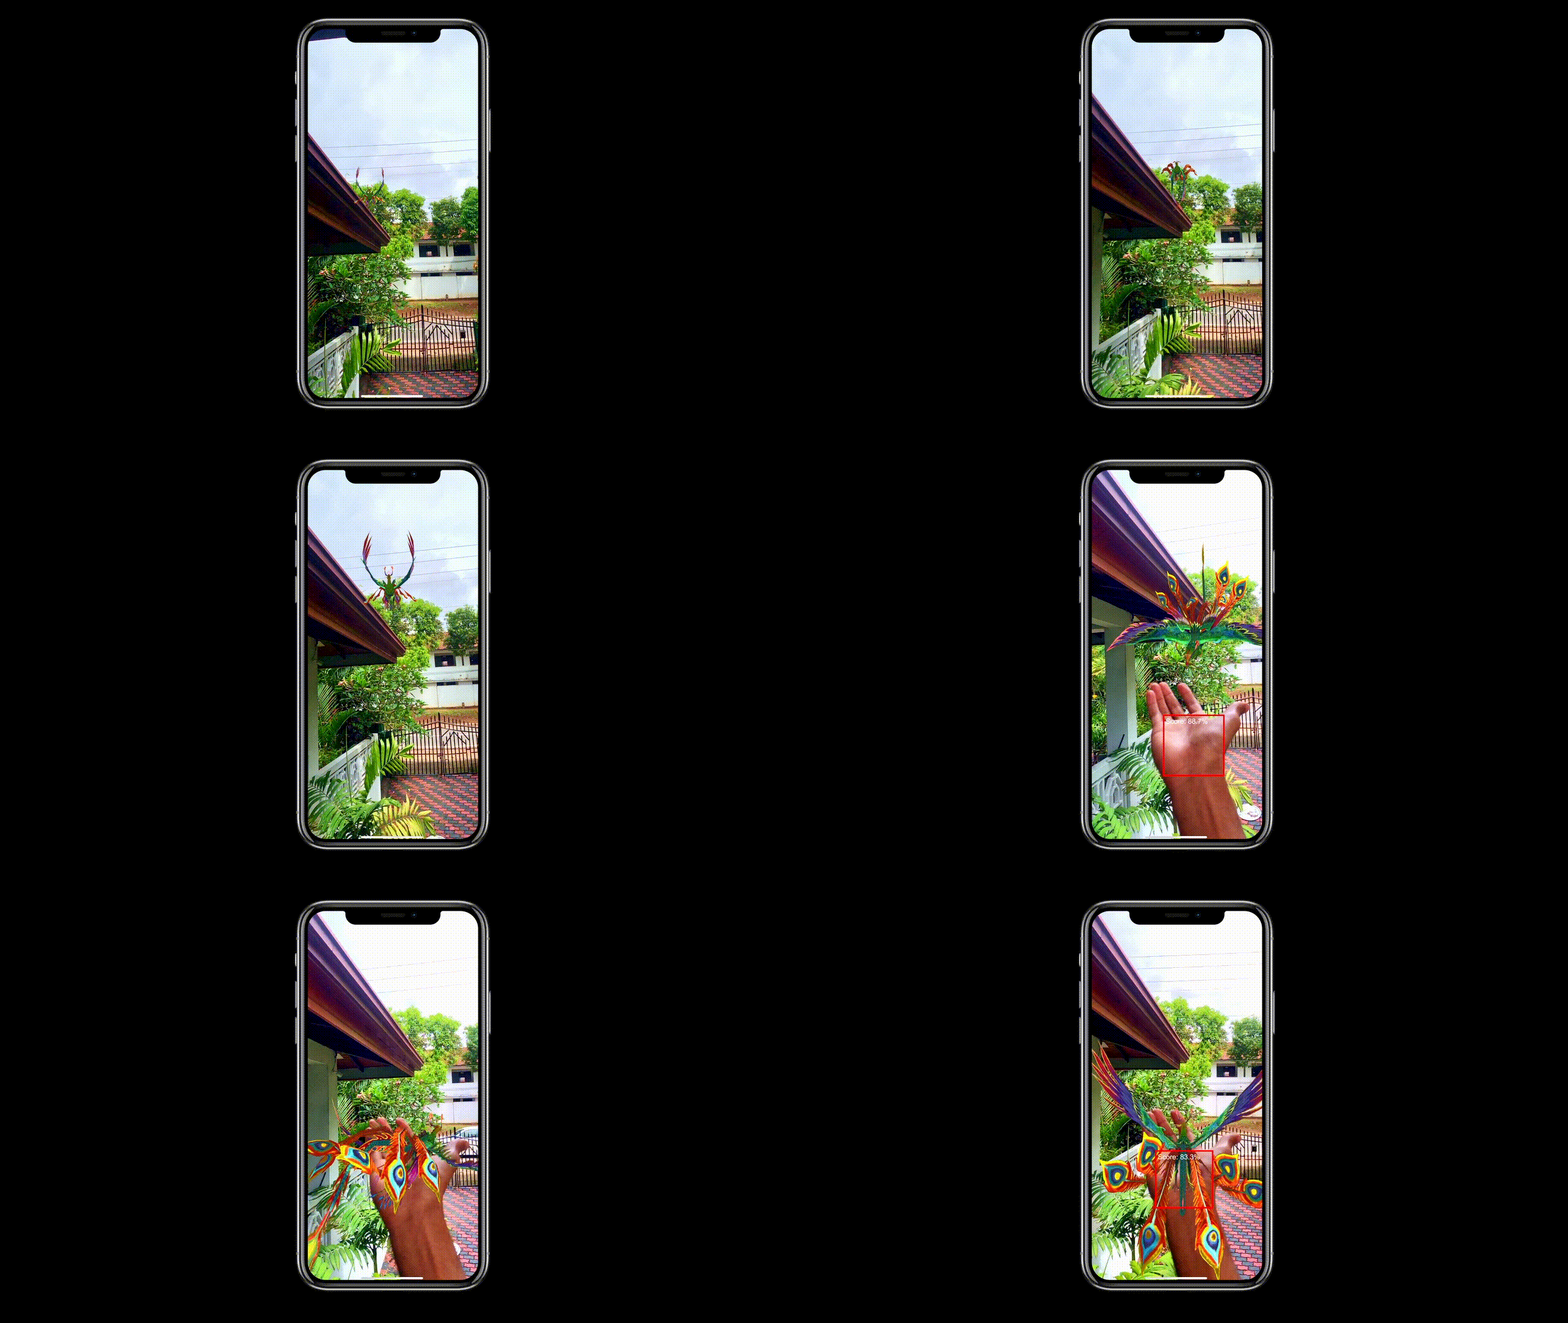
This article brings all the steps required to setup hand tracking in an AR project, including code explanations and complete source code at the end. Let's get started!
#HandTracking #AugmentedReality #AR #HandDetection #Unity3D
Getting Started with Lightship ARDK
We are using Lightship ARDK with Unity for this augmented reality project. The Lightship team recently released an update to their library to track hands in real-time, and I'm going to explain how you can use this feature in your next project.
If you are new to Lightship and Unity 3D, I recommend you to refer the below article and get familiar with our tech stack first.
If you like to learn AR in video format, check out my Udemy Course.
Metaverse 2023: Augmented Reality Game Development Course

If you are familiar with setting up a lightship project on Unity, you can proceed with the below steps.
Step 1: Open Lightship Example Project "Human AR"
Once you have imported all Lightship libraries and example projects into Unity as described in this article, go to the Project section and open,
- Assets -> ARDKExamples -> ContextAwareness -> HumanAR -> HandTracking
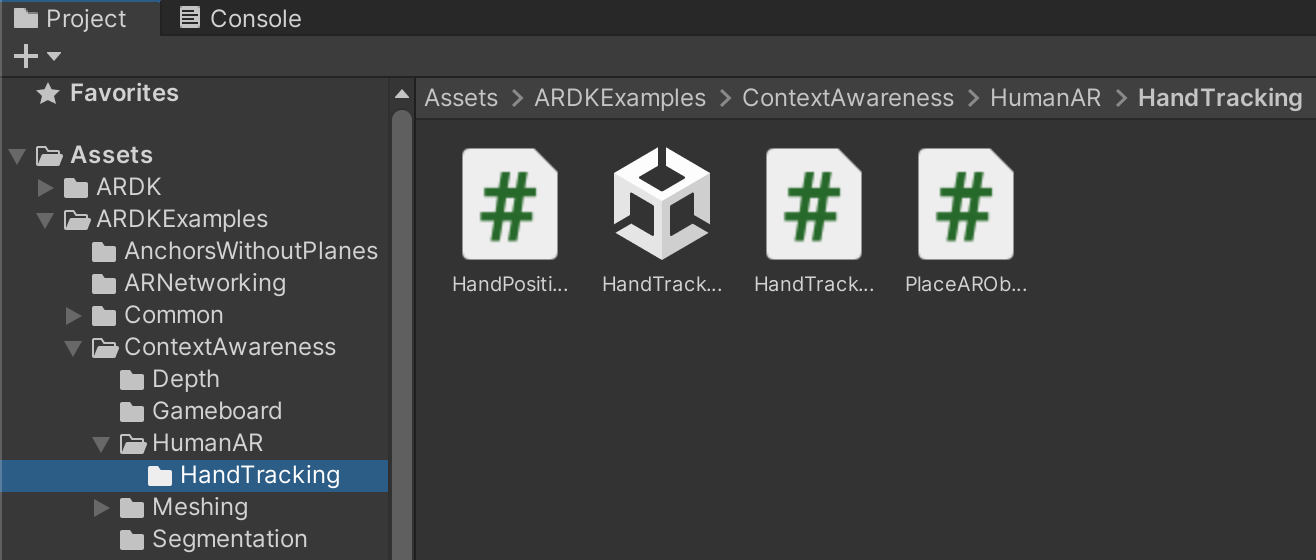
Finding Hand Tracking Sample Project
If you double-click and open the HandTracking unity scene, you can check a basic version of a hand tracking AR application. You can build this scene to Android or iOS and run it. A red colour box will appear when a hand is detected with a confidence level score. The box size also denotes the tracked hand size in a relative measurement.
Step 2: Create a Class to Read Hand Tracking Event Data
Lightship ARDK provides listeners to pass hand tracking data to other classes in the Unity project. Let's create a custom script to handle these hand tracking data first.
Create a new C# script and name it as HandPositionSolver.cs. Open this new file in your favourite code editor. Next, you need to import two packages to your new script.
```.cs
using ARDK.Extensions;
using Niantic.ARDK.AR.Awareness;
Let's declare serializable variables as below.
public class HandPositionSolver : MonoBehaviour {
[SerializeField] private ARHandTrackingManager handTrackingManager;
[SerializeField] private Camera ARCamera;
[SerializeField] private float accuracyLevel = 0.90f;
...
}
As you can see, we are using `HandTrackingManager` which is an ARDK import, and we have declared a variable  `ARCamera` which will be used to refer to the `ARSceneCamera` in the below steps. the `accuracyLevel` holds the threshold value we define to activate the trigger action once a hand is tracked. In this example, let's consider it as 90%.

We will declare another private variable inside the `HandPositionSolver` class to store the detected position of the hand.
private Vector3 handPosition;
public Vector3 HandPosition { get => handPosition; }
Now we can construct the class to read data from hand tracking events and populate values to variables that we declared above. We are listening to event updates on Start and on Destroy through the Lightship's hand tracking manager implementation as below.
void Start()
{
handTrackingManager.HandTrackingUpdated += UpdateTrackingData;
}
private void OnDestroy()
{
handTrackingManager.HandTrackingUpdated -= UpdateTrackingData;
}
Next, let's create the `UpdateTrackingData` event handler to populate values inside the class. According to the Lightship documentation, `TrackingData.AlignedDetections` should return a list of tracking data. Therefore, we are using `trackingInfo` variable to keep those data for further processing.

If there are available `trackingInfo`, we will iterate through the list and identify the size of the tracked frame and estimated depth. Once we have these data, we can estimate the hand position in the 3D world space.
private void UpdateTrackingData(HumanTrackingArgs updatedData)
{
var trackingInfo = updatedData.TrackingData?.AlignedDetections;
if(trackingInfo == null)
{
return;
}
foreach(var latestDataSet in trackingInfo)
{
if(latestDataSet.Confidence < accuracyLevel)
{
return;
}
Vector3 trackingFrameSize = new Vector3(latestDataSet.Rect.width, latestDataSet.Rect.height, 0);
float depthEstimation = 0.2f + Mathf.Abs(1 - trackingFrameSize.magnitude);
handPosition = ARCamera.ViewportToWorldPoint(new Vector3(latestDataSet.Rect.center.x, 1 - latestDataSet.Rect.center.y, depthEstimation));
}
}
ℹ️
You can find the full code as a GitHub project at the end of this article.
Now we have successfully implemented a class to estimate hand position and next, we can add some virtual object interactions with the tracked hand.
### Step 3: Virtual Object Interactions with Hand Tracking
In this step, we are going to create another class called `PlaceARObjectsOnHand`. This class will be able to position AR objects on top of the hand in real time by changing the game object's transform.
I will be using this animated 3D model for this experiment as inspired by [@Unity Adventure (YouTube)](https://www.youtube.com/watch?v=dZ0wWYFW3QE&ref=readclub.me). You also can download this model or any other object as you prefer.
[phoenix bird](https://sketchfab.com/3d-models/phoenix-bird-844ba0cf144a413ea92c779f18912042?utm_medium=embed&utm_campaign=share-popup&utm_content=844ba0cf144a413ea92c779f18912042&ref=readclub.me) by [NORBERTO-3D](https://sketchfab.com/norberto3d?utm_medium=embed&utm_campaign=share-popup&utm_content=844ba0cf144a413ea92c779f18912042&ref=readclub.me) on [Sketchfab](https://sketchfab.com/?utm_medium=embed&utm_campaign=share-popup&utm_content=844ba0cf144a413ea92c779f18912042&ref=readclub.me)
> "phoenix bird" ([https://skfb.ly/6vLBp](https://skfb.ly/6vLBp?ref=readclub.me)) by NORBERTO-3D is licensed under Creative Commons Attribution ([http://creativecommons.org/licenses/by/4.0/](http://creativecommons.org/licenses/by/4.0/?ref=readclub.me)).
Download your 3D model and import it to your Unity project. You can import files by dragging them from the Finder/Explorer window into the Project view or manually copying them to the asset folder.
Once you have the 3D model imported to Unity, you can drag your 3D model into the hierarchy panel. I adjust some position values from the Inspector panel as below. You can feel free to add your preferred object and setup it as you like.
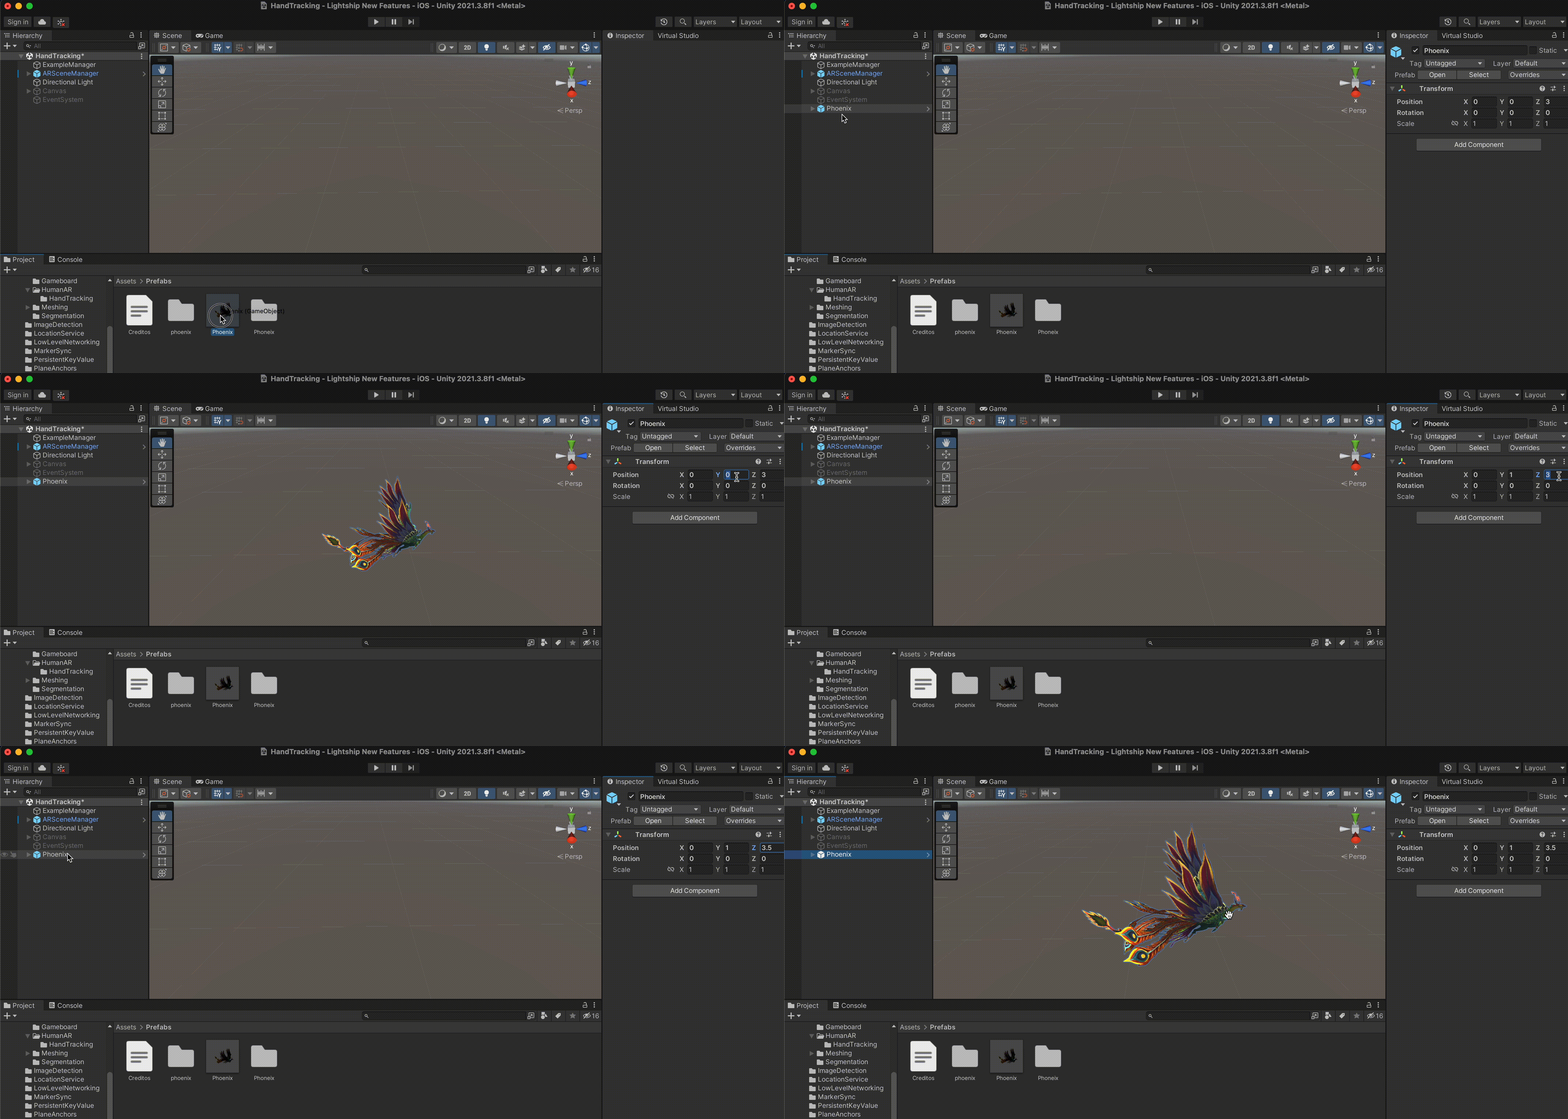
*Adding Virtual Object to the Hierarchy Panel*
Now let's create a few serializable fields to define the initial settings for the class as below.
public class PlaceARObjectsOnHand : MonoBehaviour
{
[SerializeField] private HandPositionSolver handpositionSolver;
[SerializeField] private GameObject ARObject;
[SerializeField] private float objectMovingSpeed = 0.5f;
[SerializeField] private float objectRotationSpeed = 25.0f;
private float minimumDistanceToObject = 0.05f;
private float minimumAngleToObject = 2.0f;
private bool isRequiredAngleChange;
...
}
We have some pre-defined speed values for our virtual object, but you can adjust these accordingly.

It is important to update our scene frequently because the position of the hand can vary in every frame update. Therefore, we'll call a method during the `update()` method and write our object interaction logic inside our own custom method.
void Update()
{
PlaceObjectsOnHand(handpositionSolver.HandPosition);
}
The main intention of our custom method `PlaceObjectsOnHand()` is to change the position and rotation of the virtual object according to the updated hand tracking data. We want to move the virtual object toward our hand by changing the virtual object's transform and rotation values.

-   [Vector3.Distance](https://docs.unity3d.com/ScriptReference/Vector3.Distance.html?ref=readclub.me): gives the distance between two points. We use this to get the distance between the hand and the virtual object.
-   [Vector3.MoveTowards](https://docs.unity3d.com/ScriptReference/Vector3.MoveTowards.html?ref=readclub.me): moves an object from one  point to another point. We use this to bring our virtual object toward the updated hand position.

We have a simple logic to rotate the object toward the hand if the distance exceeds the minimum distance threshold we defined.

-   [Transform.LookAt](https://docs.unity3d.com/ScriptReference/Transform.LookAt.html?ref=readclub.me): rotates the object following the forward vector toward the given point. In our example, we rotate the object toward the latest hand position.
-   [Quaternion.Slerp](https://docs.unity3d.com/ScriptReference/Quaternion.html?ref=readclub.me): makes the rotation between two angles smoother. If there is an angle change, we use this option to make the rotation.
-   [Transform.Rotate](https://docs.unity3d.com/ScriptReference/Transform.html?ref=readclub.me): rotates an object around its axis. We use this method if there is no angle change.
private void PlaceObjectsOnHand(Vector3 handPosition)
{
float currentDistanceToObject = Vector3.Distance(handPosition, ARObject.transform.position);
ARObject.transform.position = Vector3.MoveTowards(ARObject.transform.position, handPosition, objectMovingSpeed * Time.deltaTime);
if(currentDistanceToObject >= minimumDistanceToObject)
{
ARObject.transform.LookAt(handPosition);
isRequiredAngleChange = true;
}
else
{
if (isRequiredAngleChange)
{
ARObject.transform.rotation = Quaternion.Slerp(ARObject.transform.rotation, Quaternion.identity, 2 * Time.deltaTime);
Vector3 angles = ARObject.transform.rotation.eulerAngles;
isRequiredAngleChange = angles.magnitude >= minimumAngleToObject;
}
else
{
ARObject.transform.Rotate(Vector3.up objectRotationSpeed Time.deltaTime);
}
}
}
Now we have completed our class to add object interactions to work together with the tracked hand position.
### Step 4: Project Configurations and Building the App
From the hierarchy panel, select the "ExampleManager" and see the inspector panel. We will attach our two newly created scripts there.
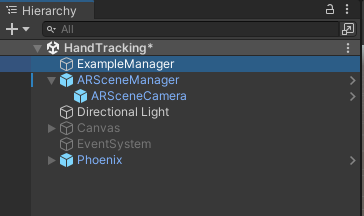
You can drag and drop your two custom scripts to the Inspector panel. And you need to assign the required game objects to your fields as below.
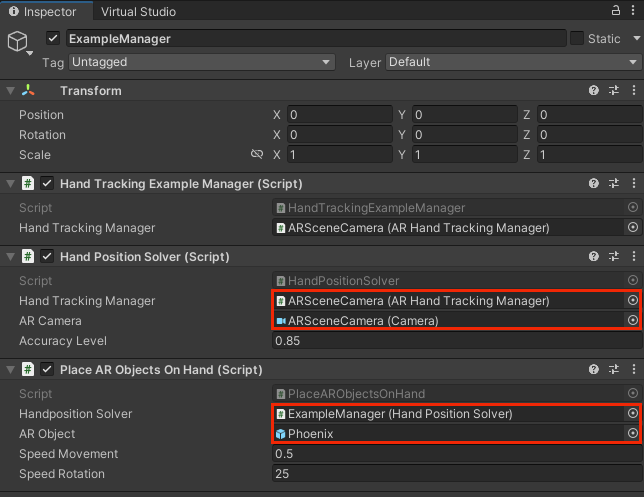
You can drag and drop these assets from the hierarchy panel to relevant fields at the inspector panel to assign those as above.
ℹ️
Note that the AR Object I have assigned for the "Place AR Objects On Hand" script is the one I downloaded from sketchfab. You can assign any 3D object of your choice for this.
Now you can build the app and test it on your device. If you are new to Lightship ARDK, I recommend you check [my previous article](https://readclub.me/game-development-with-augmented-reality/) and [Lightship documentation](https://lightship.dev/docs/ardk/ardk_fundamentals/getting_started.html?ref=readclub.me) to learn how to build Lightship ARDK apps for Android and iOS devices with Unity.
### Step 5: Output of the Hand Tracking Augmented Reality App
*The Output of the Hand Tracking Augmented Reality App*
* * *
> **Be a part of the ReadClub Community.**
> Sign up with ReadClub and enjoy exclusive content. Also, if you have further questions or comments, you can send those by becoming a ReadClub member.
[Click & Join ReadClub Premium](https://readclub.me/#/portal/signup/free)
* * *
## Complete Unity Project Source Code
[](https://github.com/yasassrime/Augmented-Reality-Hand-Tracking?ref=readclub.me)
*Hand Tracking in Augmented Reality Project Source Code*
* * *
## Download the Model Card of the Media Pipe Hands
If you are a researcher in the field of human-computer interaction, human-interfacing technology or computer vision and are interested to know the machine learning model behind this hand tracking feature, you may download the model card from the below link.
[
Model Card Hand Tracking Lite Full with Fairness - Specification Document
Hand Tracking in Augmented Reality with Media Pipe Engine
Model Card Hand Tracking (Lite\_Full) with Fairness Oct 2021.pdf
350 KB
](https://readclub.me/content/files/2022/10/Model-Card-Hand-Tracking--Lite_Full--with-Fairness-Oct-2021.pdf "Download")
* * *
## Summary
This article discussed how to implement hand tracking in augmented reality using Unity 3D and Lightship ARDK. Huge thanks to [@Unity Adventure (YouTube)](https://www.youtube.com/watch?v=dZ0wWYFW3QE&ref=readclub.me) channel for taking the heads up, and his initial work inspired this article and project.
Let's meet soon with another augmented reality guide!
Originally published on readclub.me.